
Test or restore a company backup
Check compatibility, review a separate recovery copy and protect current records with a safety backup.
What this guide helps you do
A company restore is a full-platform-administrator recovery operation. It can either build a separate suspended copy for review or replace the live company with records and files from an earlier backup.
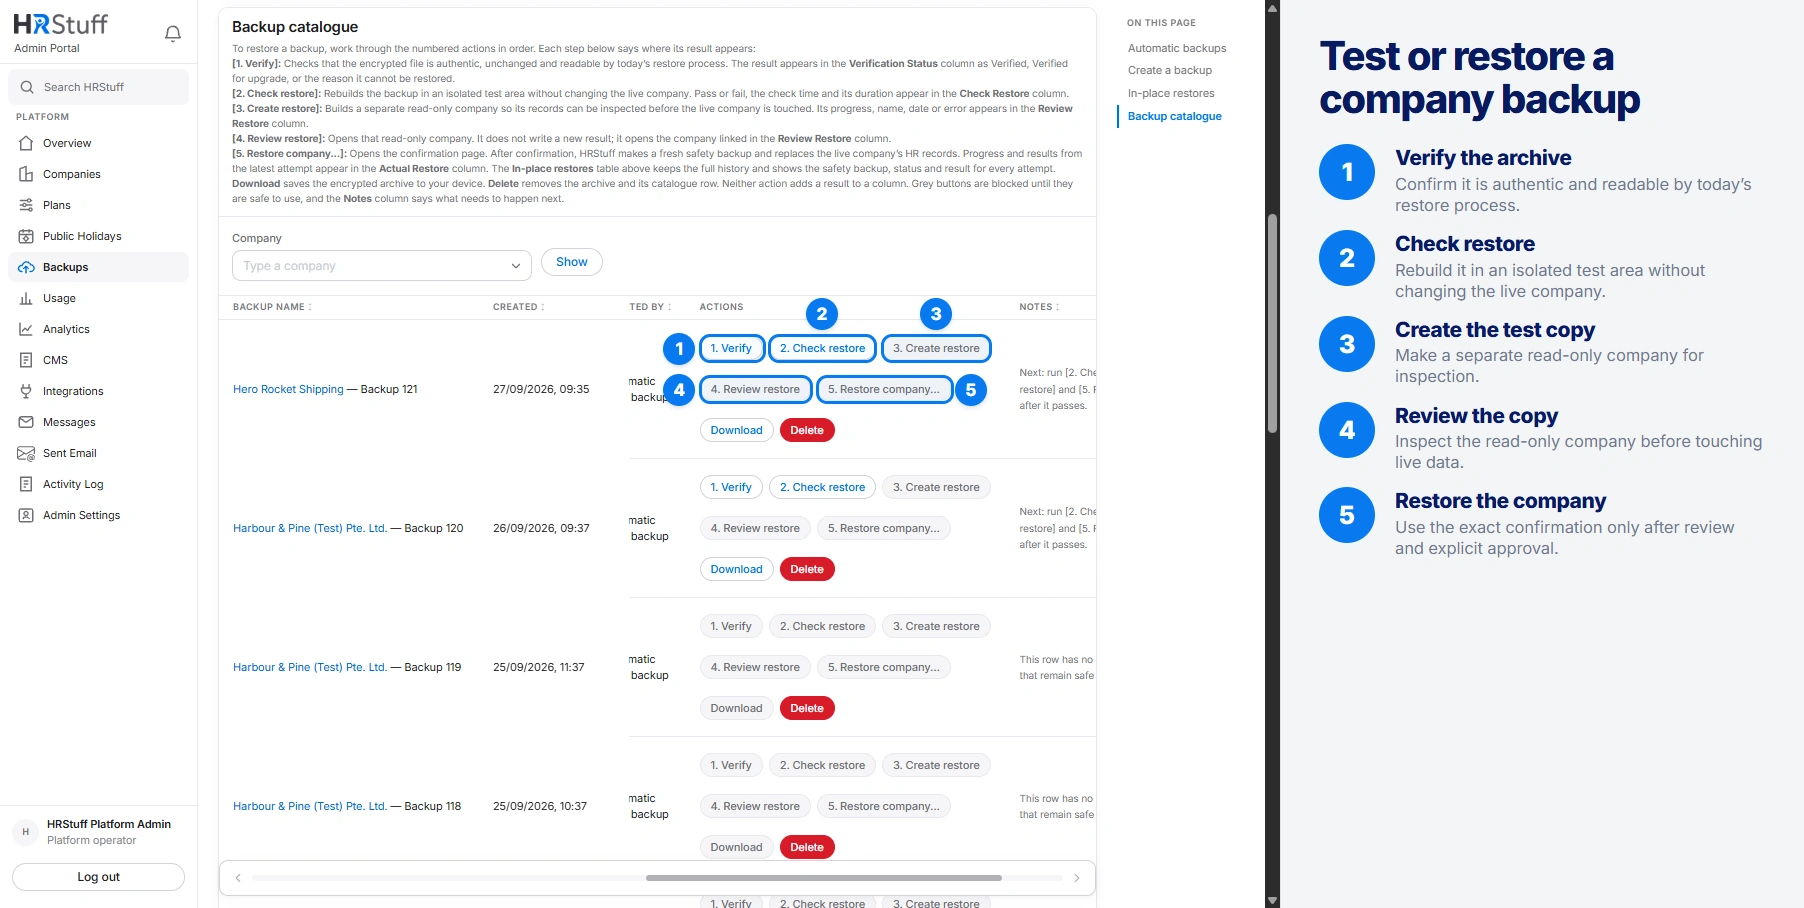
Use the numbered workflow on Platform, Backups in order. HRStuff keeps later buttons unavailable until the archive has passed the checks required by the current restore process.
Follow the five recovery steps
1. Verify
Authenticate the encrypted archive and confirm current restore compatibility. Read the exact status rather than assuming an older Verified label is still current.
2. Check restore
HRStuff rebuilds the archive in an isolated test area and then removes that test area. The live company is not changed. Wait for Passed before continuing.
3. Create restore
After the current restore check passes, type CREATE RESTORE exactly. HRStuff queues a separate company copy for review.
4. Review restore
Open the separate copy through platform read-only support mode and check representative employees, leave, claims, payroll, documents and settings.
5. Restore company
Use this only after review and explicit recovery authorisation. The confirmation page names the company, backup and snapshot, then requires the exact company-and-backup phrase shown on screen.
Understand Check restore
Check restore tests whether HRStuff can rebuild the archive with the current system, including its linked records and private files. It records whether the test passed or failed, when it ran, how long it took and any error message.
A passed result applies to the restore process that ran the test. If that process changes later, HRStuff may ask you to run Verify and Check restore again. This does not mean the backup is missing.
Review the separate recovery copy
Every login in the recovery copy is disabled, and its email address is replaced with one that cannot receive mail.
The review copy is suspended and cannot be activated.
It can be opened only through a platform administrator’s read-only support mode.
The original company and anything added after the backup remain unchanged while the review copy is created and inspected.
Deleting the review copy does not delete the backup or original company.
What to inspect before touching live data
Open several employee records, including a current employee and a leaver, and check private fields and documents.
Check leave types, entitlements, representative requests and public holidays around the snapshot date.
Check claim categories, receipts and a claim in each important status.
Check Payroll Builder configuration, a published payslip and any draft payroll expected at the snapshot.
Check company settings, integrations and Activity Log context. Record what was sampled and who approved proceeding.
What happens during an in-place restore
The company remains available while the request is queued. When the worker begins, HRStuff suspends the company and signs everybody there out.
HRStuff first creates and successfully verifies a fresh encrypted safety backup of the current company. If that safety backup fails, replacement does not begin.
HRStuff rebuilds the selected backup using the current database structure before it replaces the live company.
The company number, name, web address, plan and its current active or suspended state are preserved rather than taken from the old snapshot.
All database changes must succeed together. If any part fails, HRStuff keeps the current records and removes the temporary suspension.
HRStuff records each private file it replaces. It schedules the old files for removal only after the database restore succeeds.
Confirm the destructive step
Open 5. Restore company
Confirm the original company still exists and that no backup or restore work for it is already running.
Read the snapshot warning
The page states that data added or changed after the backup time will leave the live company. Stop if that is not the authorised recovery point.
Type the exact phrase shown
The phrase includes the source company number and backup number. Do not copy a phrase from another backup or guide.
Choose Restore company
The job is queued. Refresh Backups to follow Queued, Making safety backup, Restoring, Completed or Failed.
Review the completed result
The In-place restores table shows the chosen restore point, the fresh safety backup, status, restored record and file counts, completion time and any failure. Keep that safety-backup reference with the recovery record.
After completion, repeat the representative checks used on the review copy and confirm that authorised users can sign in. If the restored result is not acceptable, do not make unrelated changes first: the verified safety backup is the clean route back to the pre-restore state.