
Add an employee
Create an employee record, decide whether the employee needs a login and optionally attach an employment document.
What this guide helps you do
An employee record stores the person’s employment information. It does not automatically give them access to HRStuff. You can create their login now or add it later when they are ready to sign in.
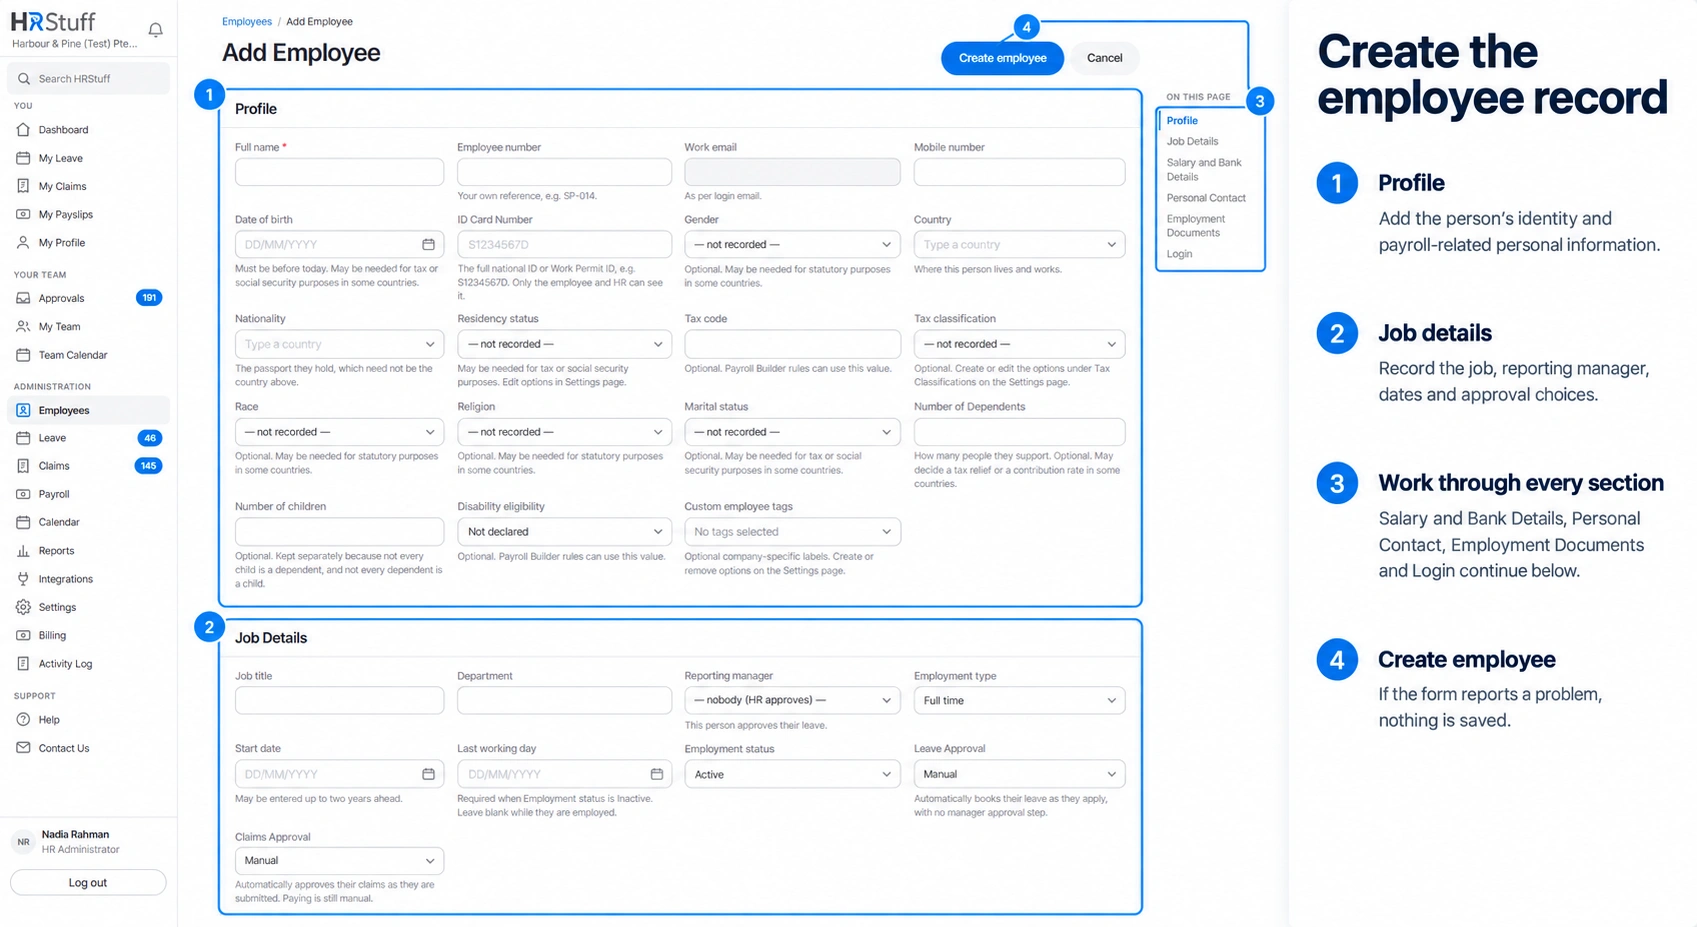
Only an HR administrator can add an employee. Go to ADMINISTRATION → Employees, then select Add employee.
What to have ready
The employee’s full name and, if your company uses one, employee number.
Their job title, department, employment type, start date and reporting manager.
The employee’s country, nationality and residency status, if your company’s payroll rules need this information.
The employee’s basic monthly salary, the date that salary begins and their bank information, if payroll is enabled.
A work email address that is not used by another HRStuff account, and the access role the employee needs, if you want to create their login now.
Create the employee record
Enter the employee’s personal information
Enter the employee’s full name, employee number, mobile number and any other identifiers your company uses. You do not enter the work email separately. If you create a login, HRStuff uses the login email as the employee’s work email.
Some payroll rules may use the employee’s date of birth, residency status, marital status, number of dependants or number of children. Record this information only when your company has a valid employment or payroll reason to keep it.
The employee number is your company’s reference for that person. If you enter one, it cannot be used by another employee.
Country means where the person lives and works. Nationality means the passport or citizenship they hold; the two do not have to match.
Choose the employee’s residency status from the options your company created in Settings. Payroll rules may use this information, so leave it blank if you are unsure and confirm it before continuing.
Use ID Card Number for the employee’s national identification number, work-permit number or similar identifier. Only the employee and HR can see this information.
Enter the employee’s number of dependants as a whole number. Enter 0 if they have no dependants. Leave the field blank if the information has not been recorded.
The number of children is recorded separately from the number of dependants because the two may be different. Enter a whole number, including 0, only when your company has a valid reason to keep this information.
Complete Job Details
Enter the employee’s job title, department, reporting manager, employment type and start date. The start date can be up to two years in the future. Choose Active if the person currently works for the company. If you later change their status to Inactive, you must enter their last working day.
Choose how the employee’s leave and claims are approved. Manual sends the request to an approver. Automatic approves the request immediately without waiting for a person to review it.
If your company uses manager approval, leave and claim requests are sent to the employee’s reporting manager. Choose Nobody if HR should receive the requests instead.
Employment type describes how the person is employed, such as full time or part time. Payroll rules may use it, but it does not control whether the person can sign in.
Employment status shows whether the person currently works for the company. Login access is managed separately, but changing an employee to Inactive also disables their login.
Add salary and bank details
If payroll is enabled, enter the employee’s basic monthly salary and the date it begins. If their salary changes later, add the new salary with its new start date. Earlier payroll periods will continue to use the previous salary.
Only HR can see the employee’s full bank account number. Payslips show only its last four digits.
SWIFT code identifies a bank for international payments and is normally 8 or 11 characters.
Bank code may be called a sort code, routing number, ABA or IFSC in your country.
Branch code is needed only where the bank identifies the account’s branch separately.
Add personal and emergency details
Add the employee’s personal email, emergency contact and home address if your company needs them. These details are private and are not shown to the employee’s manager.
Attach an opening document if useful
You can attach an employment contract or another document while creating the employee. Check the permitted file types and maximum size beside the upload field. The employee and HR can open the document later, but the employee’s manager cannot.
Decide whether to create a login
Leave the Login section blank if the employee does not need access yet. To create a login now, enter a login email that is not used by another account, choose the access role needed for their job and choose how they will set their password.
Email setup link: HRStuff emails the employee a link for creating their password. The link can be used once and expires after seven days.
Temporary password: create a temporary password and give it to the employee securely. HRStuff asks them to replace it when they first sign in.
A login email cannot already belong to another user. The page reports whether an invitation email was delivered.
Employee gives access to the person’s own information. Manager also gives access to permitted information and tasks for their direct team. Assistant Admin gives company-wide access to leave and claims. HR administrator gives full access to company administration.
Save and read the confirmation
Select Create employee. If something needs correcting, the error summary lists each problem and links to the relevant field. Correct the information and submit the form again. When the employee is created successfully, HRStuff opens their new record.
Finish the employee’s setup
Review the new employee record. Check that the reporting manager, approval settings, leave entitlement and Standard Payslip are suitable for this employee.
Check the reporting manager and approval choices.
Set any personal leave entitlement; a blank personal figure means the company default applies.
Review the employee’s Standard Payslip and check any regular payments or deductions before creating their first draft payslip.
If no login was created, use the Login card later when the employee should receive access.
Important cautions
Do not delete an employee when they leave the company. Change their Employment status to Inactive. This preserves their payslips, leave, claims and activity history, and disables their login.
Before sending a setup link or temporary password, confirm that the selected role gives the employee only the access they need.
Salary, bank information, personal details and employment documents remain private from managers.
If a former employee returns, change their Employment status back to Active. If they need access to HRStuff, enable their login separately.