
Apply for leave
Choose a leave type and dates, check how many leave days will be used and submit the request.
What this guide helps you do
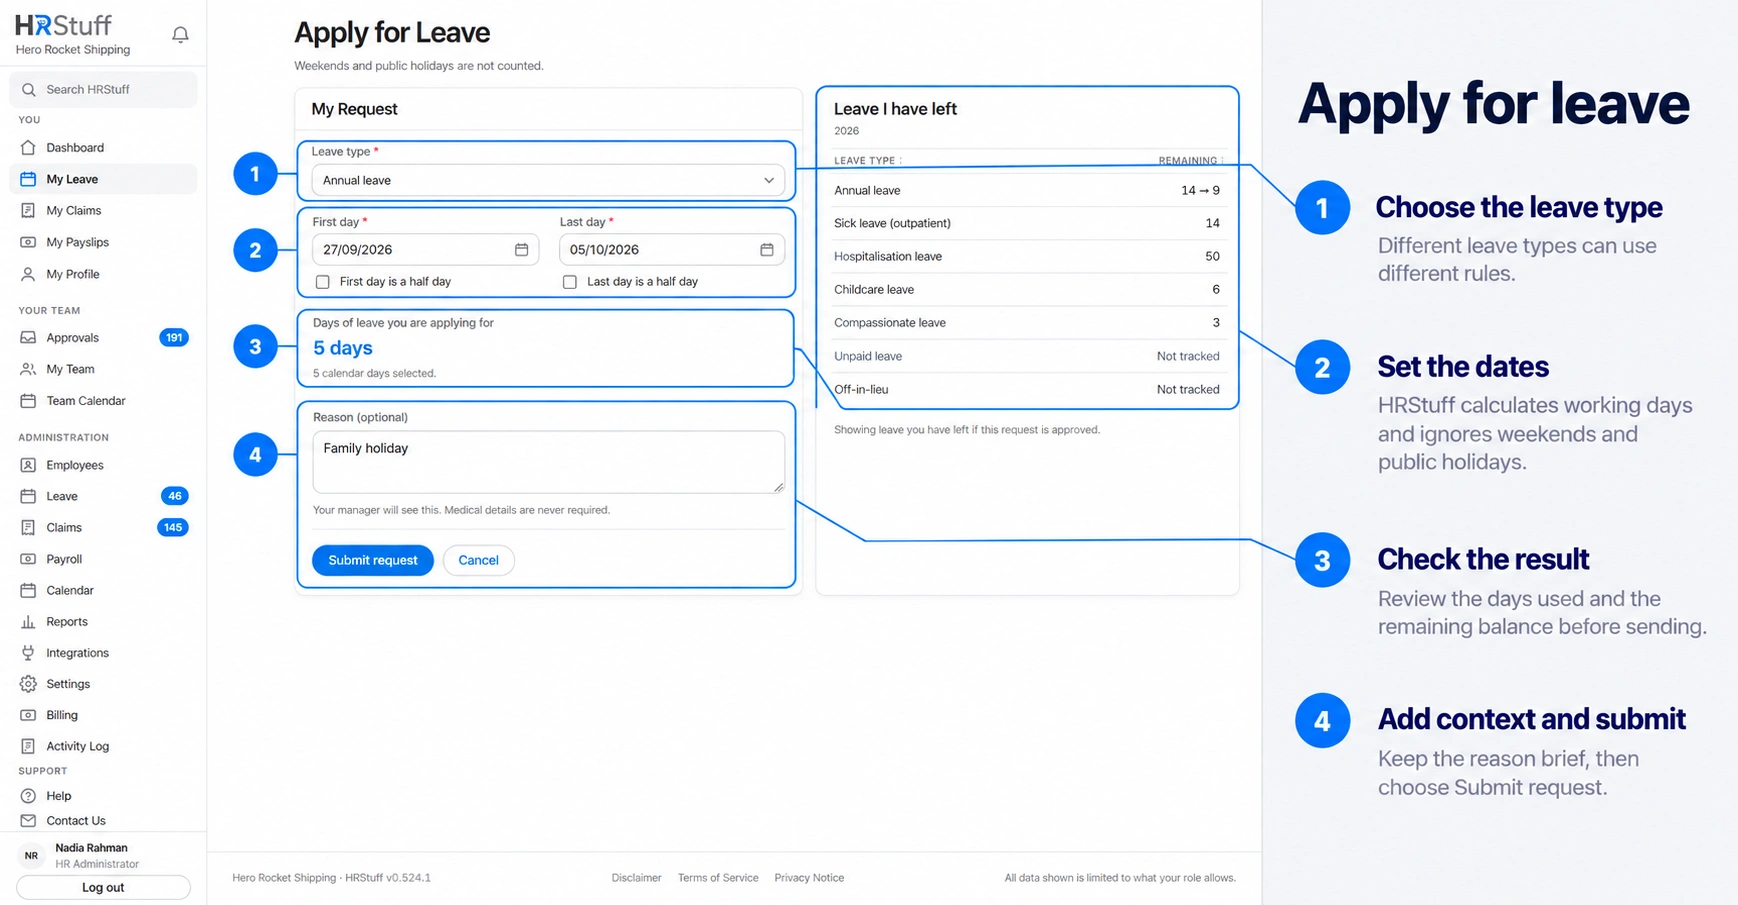
Use Apply for Leave to choose a leave type and dates. HRStuff calculates how many leave days the request will use, excluding non-working days and company public holidays. It also checks your available balance, overlapping requests, allowed dates and the rules for that leave type.
You must have an HRStuff login connected to your employee record. Go to My Leave, then select Apply for Leave.
Check before applying
Choose the leave type that matches your request. HRStuff shows only the leave types your company currently allows employees to use.
Check the balance shown under Leave I have left. If HRStuff tracks a balance for this leave type, you cannot request more days than you have available. Pending requests are already deducted from the available balance.
One request cannot include dates from two different leave years. Submit one request for the dates in the first leave year and another for the dates in the next leave year.
You cannot submit two leave requests for the same date. Change the new request’s dates, or cancel or correct the earlier request first.
Submit the request
Choose the leave type
Select the leave type that matches your request. Each leave type may have different rules for available days, half days and approval.
Choose the first and last day
Choose the first and last day of your leave. The last day must be on or after the first. Both dates must fall within the same leave year. The first day cannot be more than 365 days ago, and the last day cannot be after the end of the company’s next leave year.
The page shows the number of leave days your request will use. HRStuff uses the same calculation when you submit the request, so the number shown is not an estimate.
Choose a half day if the leave type allows it
If the leave type allows half days, you can make the first or last day a half day. For leave on one date only, choose either AM or PM. You cannot select both the first-day and last-day half-day options for the same date.
A weekend or company public holiday does not use any leave. Selecting a half day on one of those dates therefore has no effect.
Add an optional reason
Keep the reason short and suitable for work. Your approver can read it, but it is not shown on team or company calendars.
Check your balance after this request
Leave I have left shows your current balance and how many days would remain after you submit the request. Pending requests count against your available balance while they wait for a decision.
Choose Submit request
If the request has a problem, HRStuff keeps the form open and explains what you need to correct. Your leave is not booked until the request passes all checks.
How the days are counted
HRStuff starts with all the dates in your request. It removes days that are not part of the company’s working week and removes company public holidays. It then applies any valid half day.
You cannot submit a request containing only non-working days or company public holidays because it would use no leave. If HR changes the working week or a public holiday before your request starts, HRStuff recalculates the number of leave days. Once leave has started, its recorded total does not change.
What happens after submission
Automatic approval: HRStuff approves and books the request immediately. No manager or HR administrator needs to review it.
Manual approval: the request remains Pending until it is reviewed. HRStuff sends it to the approver selected in Leave Settings, usually the employee’s reporting manager or HR. An HR administrator can also decide a pending request.
Balance check when approving: HRStuff checks the employee’s balance again before approving a pending request. This prevents two requests from using the same available leave.
Approved leave appears on the appropriate HRStuff calendars. The employee receives a notification when the request is approved or rejected.
You can cancel your own request while it is still Pending. After it has been approved or rejected, it remains in the company’s records. Contact HR if it needs to be corrected.