
Find your way around HRStuff
Understand the left navigation, page actions, search, filters and “On this page” links.
What this guide helps you do
HRStuff shows each person only the menu items and pages available to them. These depend on the company’s features, the person’s login role and whether anyone reports to them, so coworkers may see different menus.
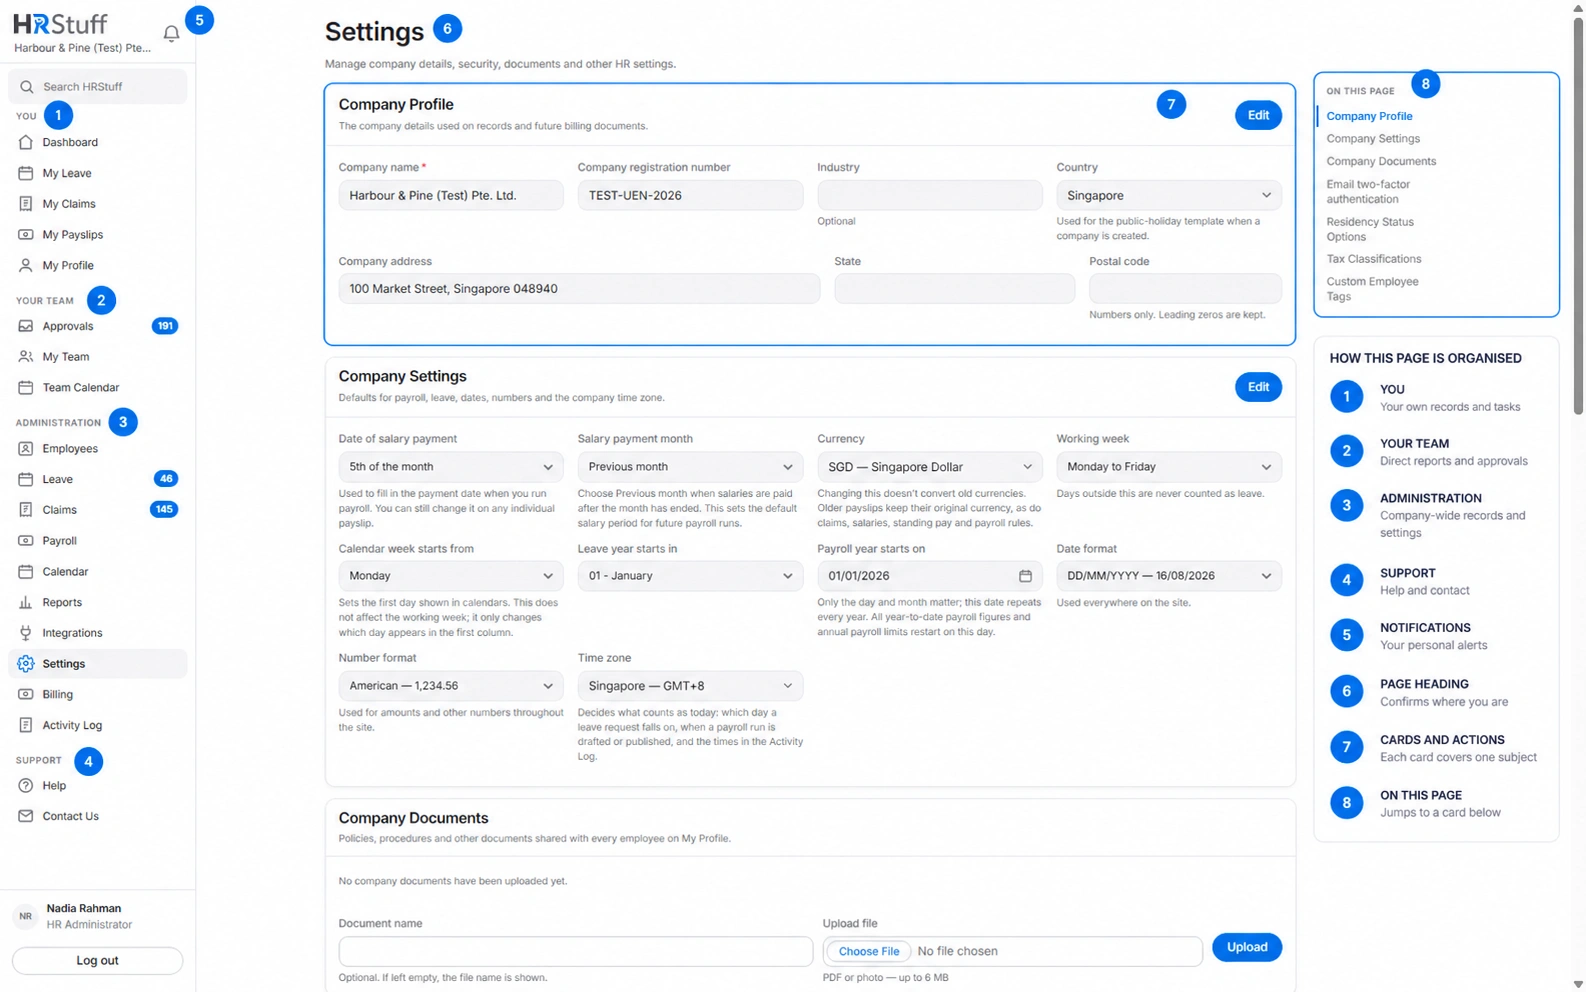
Most work starts in the left menu. On a phone or narrow window, choose Menu at the top to open the same links. The page title confirms where you are, and the company name beside the HRStuff logo confirms which company you are working in.
Read the parts of a page
Start with the page heading
The title tells you where you are in the site. The short line below it gives additional info and context. Buttons at the top right are the main actions for that page.
Use cards for one subject at a time
A card groups related information. Edit, Manage or another card action changes only that subject. Use Save to keep a change or Cancel to leave the saved record as it was. A success message confirms a completed change; a field-level message explains what still needs attention.
Use On this page on long screens
Long pages with several cards may show On this page beside the content or as a button near the page heading. Choose a section name to jump to that card. It does not open a different record, save a change or apply a filter.
Return with the page’s own link when possible
Use Back, Cancel or the breadcrumb shown by the page when you want to preserve its intended context. Your browser Back button is also safe, but it may return to an earlier set of filters or an earlier page of results.
Search, filter and sort lists
Use Search HRStuff in the sidebar, or press Ctrl+Space, to find pages, actions and records from anywhere in the signed-in product. Results include only the company information your role is allowed to view. Search boxes inside individual lists still filter only that list.
Filters narrow the records shown. Choose the page’s Show or Filter button when one is provided; use Clear to return to the unfiltered list.
Choose a column heading with a small sort arrow to reorder the list. Choose it again to reverse the order.
A result count tells you how many records match. If a list has pages, use the page numbers or arrows to see the rest.
Tick boxes act on the records you selected. On paged lists, selecting all normally selects the current page, not every matching record in the company. Read the confirmation before a bulk action.
Use the Dashboard as a starting point
The Dashboard summarises current work, such as requests waiting for you, upcoming leave and recent personal records. Its cards link back to the page that owns the full record.
Dashboard figures come from the underlying records; the Dashboard does not store a separate copy. If a total looks unexpected, open the linked Leave, Claims, Payroll or employee page and check the underlying filters and records there.
Know where you are before changing anything
Check the company name near the logo, especially if you also use a test company or provide platform support.
Check whether the page is under YOU, YOUR TEAM or ADMINISTRATION. Each area can show different people and records.
Read warning and confirmation boxes. They name effects that are not obvious from the button alone.
Use Log out at the bottom of the menu when you finish on a shared device.