
Connect HRStuff to Make
Use the installed HRStuff Make app for a one-event trigger, or send selected events to a Make Custom webhook.
What this guide helps you do
HRStuff can start a Make scenario when a selected HRStuff event occurs. For example, a scenario could post a new leave request to a team channel or add an approved claim to another system. You first choose what HRStuff event starts the scenario, then choose what Make should do with the event.
There are two separate ways to connect:
The installed HRStuff Make app is the simpler option for most people. Its Watch HRStuff Event module creates and removes its own dedicated connection to HRStuff.
A Make Custom webhook is a manual option for people who already use Make’s built-in Webhooks app or want to send several selected HRStuff event types to one scenario.
Use only one method for the same automation unless you deliberately want two copies of every event. The installed-app connection and the manual Custom webhook are independent, so changing or disconnecting one does not change the other.
Choose the Make setup method
Use the installed HRStuff Make app for the guided setup described below. Each Watch HRStuff Event trigger watches one event type, such as Leave request approved. When you create its webhook, Make registers that trigger with HRStuff. When the webhook is detached, Make removes that exact trigger.
Use a Custom webhook if you already work with Make’s built-in Webhooks app or want several HRStuff event types delivered to one webhook address. You create the address in Make, paste it into HRStuff and choose the events in HRStuff yourself.
The HRStuff Make app is installed from the invitation shown in HRStuff. Install it in the same Make organisation where you will build the scenario. If you switch organisations, the app may not appear when you search in the scenario builder.
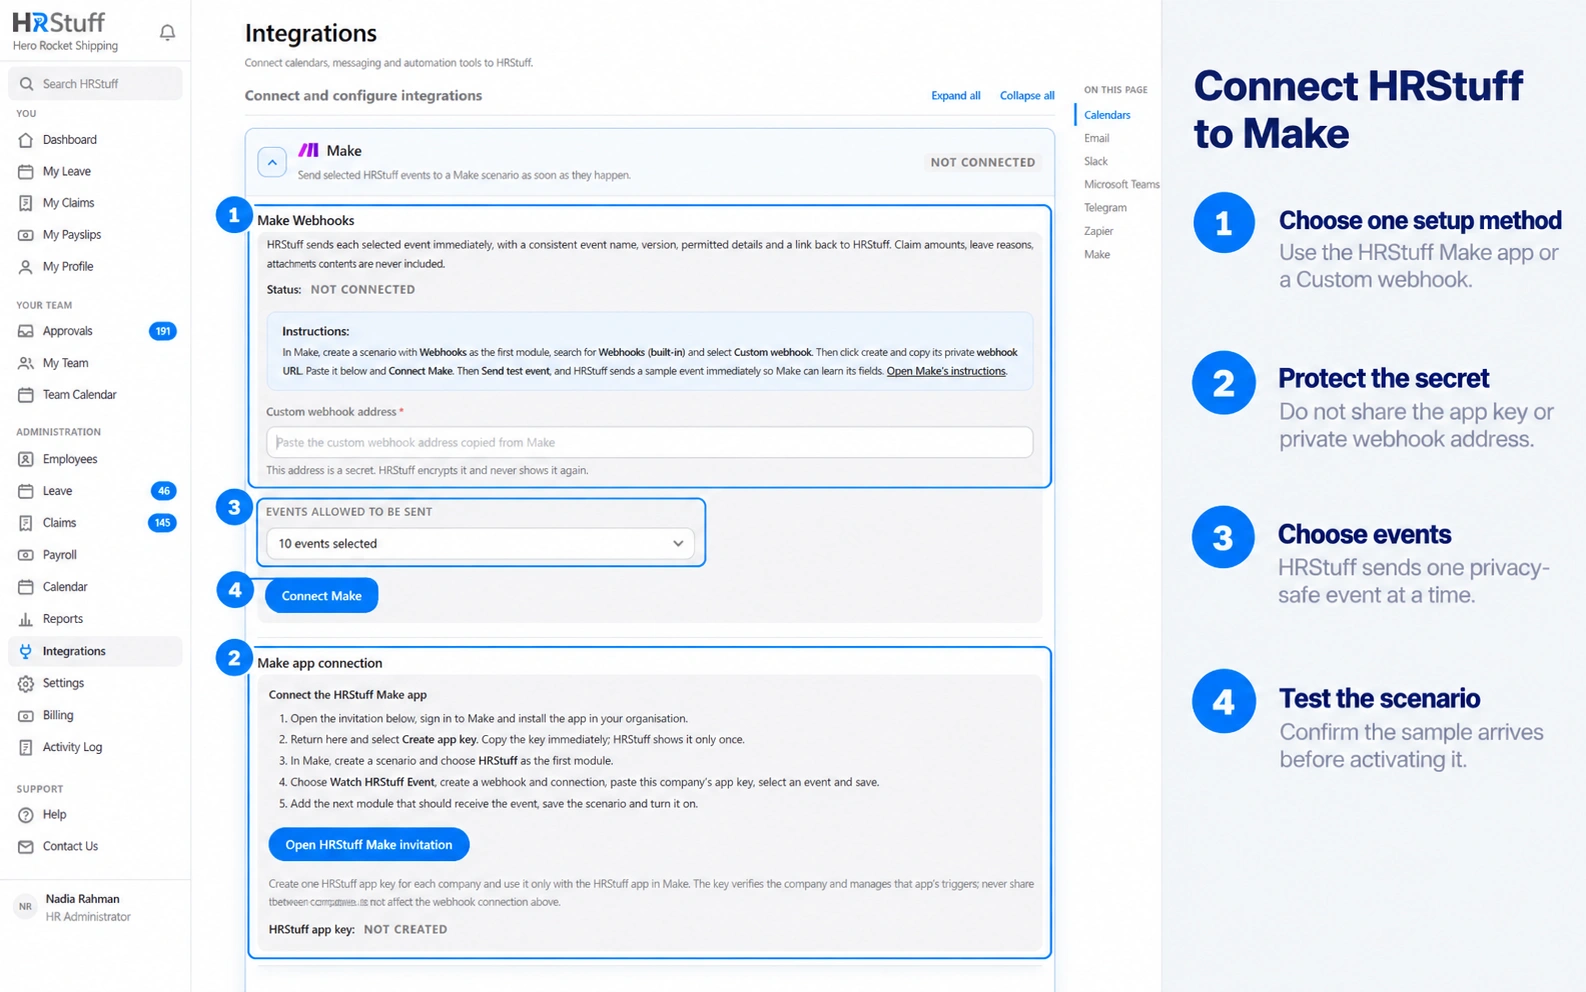
Connect the HRStuff Make app
Install the HRStuff Make app
In HRStuff, open ADMINISTRATION → Integrations and expand Make. Under Make app connection, choose Open HRStuff Make invitation. A Make page opens. Sign in to the Make account that will own the automation, select the correct organisation, then install the app.
Installing the app only makes HRStuff available in that Make organisation. It does not connect company data or create a scenario.
Create and copy the company app key
Return to the Make section in HRStuff and choose Create app key. Copy the complete key while it is visible and keep it private until you paste it into Make. HRStuff shows the full key only once and cannot display it again.
The key belongs to the current HRStuff company. If you administer more than one company, create and use that company’s own key instead of reusing this one.
Create a scenario and open the app list
In Make, open Scenarios from the left sidebar and choose + Create a new scenario. The scenario builder opens. Give the scenario a useful name, then select the large plus button in the centre of the canvas to open the app list.
Use the search box to search for HRStuff and select the installed HRStuff app. If it is not listed, check that you installed it in the Make organisation currently shown in the builder.
Choose the HRStuff trigger module
Choose Watch HRStuff Event from the HRStuff module list. This is an instant trigger, which means a new matching HRStuff event starts the scenario rather than waiting for a timed check.
The module opens its setup panel. You now need to create the saved Make webhook that identifies both this HRStuff company and the one event the scenario will watch.
Connect this HRStuff company
In the module’s Webhook field, choose Add to create a webhook. In the webhook setup, add a new HRStuff connection when Make asks for one. Give the connection a recognisable name, paste the complete app key copied from HRStuff into HRStuff app key, then save the connection.
Make checks the key with HRStuff. A successful connection represents this company, not an individual HRStuff user. It does not give Make a browser login or permission to open private HR records.
Name the webhook and choose one event
Give the webhook a name that describes the event, such as Approved claims from HRStuff. In the Event field, choose the exact HRStuff event that should start this scenario, for example, Leave request awaiting approval, Expense claim approved or Payslip published, then save the webhook and the module.
Saving the webhook connects it to HRStuff. One Watch HRStuff Event webhook watches one event type. Use a separate scenario when another event needs a different action or destination.
Add the destination module
Select the plus beside the HRStuff module, search for the app that should receive the event and choose the required action module. Connect the destination account when Make asks.
Open each destination field and map only the HRStuff values it needs. The HRStuff module exposes the event type and status, company details, time, relevant names and a secure link back to HRStuff.
Run one complete test
Choose Run once in the scenario builder. Make now waits for the event selected in the HRStuff trigger. In a safe test company or record, perform the matching action in HRStuff, for example, submit a test leave request if the selected event is Leave request awaiting approval.
Return to Make and open the numbered output above each module. The first shows the data received from HRStuff; the second shows what the destination module did with it. Testing the destination may create or change a real record, so use a test channel, folder or record where possible and remove the test item when finished.
Save and activate the scenario
Choose Save on the scenario toolbar. For this instant trigger, keep the schedule set to Immediately as data arrives, then switch the scenario on. New matching HRStuff events will start it; earlier activity is not replayed.
Use a name that states both the event and destination, such as Approved claims → Finance channel. This makes several HRStuff scenarios easier to tell apart later.
Protect and maintain the Make app key
Paste the key only into the HRStuff app connection in Make. Do not put it in a mapped scenario field, message, shared document, Custom webhook or unrelated HTTP module.
If you lose the key before connecting Make, choose Replace app key in HRStuff and copy the newly shown value. Replacing it makes the old key unusable.
If you replace a key that is already in use, every Make connection using the old key stops working and its HRStuff app triggers are removed. Open each affected scenario, reconnect HRStuff with the new key, recreate or select its trigger webhook, test the route again and reactivate the scenario.
Choose Revoke app key when you want to remove every HRStuff Make-app trigger created with that key. Revoking the key does not disconnect a separate manually pasted Custom webhook.
Removing or replacing one attached webhook removes only that webhook’s HRStuff subscription. Other Make scenarios using the same active company key continue to work.
Connect a Make Custom webhook
Create a scenario and open the app list
In Make, open Scenarios and choose + Create a new scenario. Select the large plus button in the centre of the canvas to open the app list. Search for Webhooks and select Webhooks, the built-in Make app.
Choose Custom webhook
Choose Custom webhook from the Webhooks module list. In the module’s Webhook field, choose Add. Enter a name that identifies the HRStuff company and route, then save it.
Make creates a unique private address on a Make hook domain, such as https://hook.make.com/ or a regional variation. Copy the complete webhook address shown by Make. Copy this generated address, not the ordinary address in your browser bar. Treat it like a password because anyone who has it can send data to the scenario.
Connect the webhook in HRStuff
Return to ADMINISTRATION → Integrations → Make in HRStuff. Under Make Webhooks, paste the copied address into Custom webhook address. Open Events allowed to be sent and select every HRStuff event type that this one scenario should receive, then choose Connect Make.
HRStuff checks the address, encrypts it and does not display it again. It also sends a safe integration.test sample immediately so Make can learn the available fields.
Confirm that Make received the sample
Return to the Custom webhook module in Make. The webhook setup should show that data was received and the module should expose the HRStuff sample fields. Save the module.
If Make is still waiting for data, leave it listening, return to HRStuff and choose Send test event. Then return to Make and check again. You do not need to create a real leave request, claim or payslip.
Add and configure the destination module
Select the plus beside the Webhooks module, choose the app and action that should receive the HRStuff event, and connect the destination account. Map only the fields the destination needs from the Custom webhook bundle.
If several HRStuff event types enter this one scenario, the type field identifies which event arrived. Add filters or a router in Make when different types need different actions.
Test, save and activate the scenario
Choose Run once, then choose Send test event in HRStuff. Inspect the output bubbles in Make and confirm that the destination result is correct. A destination action may create or change real data, so use a safe test destination.
Choose Save, keep the instant-webhook schedule set to Immediately as data arrives, then switch the scenario on. HRStuff sends each newly selected event to this Custom webhook as a separate automation delivery.
Understand the event Make receives
Make receives one HRStuff event at a time, not a 15-minute or daily summary. Each event includes its type, status, time, company, time zone, permitted details and a link back to HRStuff.
Depending on the event, the safe data may include employee, requester and approver names. HRStuff does not send claim amounts, leave reasons, attachments or payslip contents. A person who follows the HRStuff link must still sign in and have permission to view the page.
The integration.test data used by a manual Custom webhook is only a sample for matching fields. It is not a real leave, claim, payroll or delegation event. An active scenario runs when a new selected event occurs.
Change, test or disconnect Make
To change the event watched by an installed-app scenario, open its Watch HRStuff Event module and edit or replace the selected webhook with one configured for the new Event. Save the module, run a new end-to-end test and reactivate the scenario.
To stop an installed-app route completely, deactivate the scenario and remove its HRStuff trigger webhook when it is no longer needed. Detaching that webhook tells HRStuff to remove its exact subscription; it does not affect other scenarios using the same active key.
For a manual Custom webhook, Save Make settings changes the selected HRStuff event types without showing or replacing the saved private address.
Send test event sends a new integration.test sample to the saved Custom webhook immediately. It does not create a real HRStuff record.
Change webhook replaces the saved Custom webhook address and its event selection. Pending deliveries for the old address are cleared rather than sent to the replacement.
Disconnect deletes the saved Custom webhook from HRStuff and stops that route. It does not deactivate the Make scenario or remove an installed-app trigger.
If Make says it is waiting for data, choose Run once and check that the correct webhook module is listening before sending another test. If HRStuff says Needs attention, confirm that the Make scenario still owns the saved webhook before replacing it.